Scoreboard are important for events like arts fest, sports and college day. If you are buying software for such school or college function you need to spend around $250. But now you can download it for free from here. It will help you to present single event score as well as multi event scores.
You can download php based scoreboard software from below.
It is after a long interval I am writing a blog post. In this article, I am planning to explain how to check whether the voters list contain your name or not, how to locate polling station, how to enroll name to list and how to download complete voter list in single file. You have to check this because; if the voters list didn’t have your name you can’t vote in 16 th lok sabha election 2014. Some time you may vote previous election but it didn’t means the name is still there. Your name may or may not be deleted. So it is important to check voters list before the last date of enrollment.
How to Check Status Via Online & Text Message
This year Indian election commission had provided two direct methods to check status of voter list of general election. This facility is already announced by chief election commissioner V S Sampath in election schedule declaration press meet. You can check voter list entry by yourself independent via online. For step by step instruction on detect voter list please watch this video.
Here you can search either by name, voters’ id, booth wise, district wise, state wise and assembly constitution wise.
You can also check status through SMS. For message format and mobile number please see video below.
You can also check offline. You can get list of voters from panchayath or from touch screen placed at collectrat & taluk, or by visiting booth level officer (BLO).
You can also call toll free number 1950 of election commission for the same information.
If your name is not included in voters list please enroll your name as early as possible. For information on adding name at voters list please continue reading. (#link to add name to list)
Know Your Assembly Constituency
It is important to locate booth address or location before going to vote. To find your polling station please watch clip attached below.
How to Download Complete PDF Voter List
You can download PDF version (single file) of voters list contain details of entire voters of parliamentary poll in a particular both or legistrative assembly constitution or state or the entire country in local language. To know how please watch below embedded video.
How to Add Your Name in Voter List Online & Offline
Steps to add your name to voter list (e-registration) as follows.
5. In this new site you can see login form. Here you had to enter username and password that you receive at your phone.
6. Now you can see a form. Please fill it and submit. Once your application submitted, Booth level officer (BLO) will download it and visit your residence or inform you to meet him o verify entries that you made.
Now the offline method. First you had to download application form 6 & fill it and submit it to ERO (Election Registration Officer).
If you don’t have photo election id card, you can get it along with this. You need only to mention you don’t have identity card in the application form.
You an also complaint errors and problem/issue with existing list and correct it along with new enrollment camp.
News & Updates
For new updates and news regarding assembly election please visit Facebook and twitter or election commission official website.
So I conclude that, All citizens of india have the right to cast their votes. So please utilize this opportunity and make you vote to right candidate. Remember that this is the change to decide who should lead india for next five years. We have Rahul Gandhi (for upa), Nerandra Modi (for bjp), aravind kajarwal (for aap) & jai lalitha as Prime Minister Candidates.
This time election start from april 6th and ends on may 12th. The vote counting & results will be declared on may 16th.
Tag: voters, internet, net, web, shabha, Loka, saba, sabha, raj, raja, register, boot, find, look, search, electoral, rolls, where, how, trick, tips, tutorial, guideline, requirement, documents, claim, timing, date, day, last, rules, NRI, NRE, foreigners, parties, political, past, removed, reason, read, add, through, mob, information, details, info, vote, voter, drive, visit, process, steps, Indian, barath, bjp, congress, upa, officer, free, agent, fill, pune, shaba, elect, seat, seat, congress, election update, conference, event, Opinion, campaign, ceremonies, booklet, offer, full list, cpim, ldf, left democratic front, nominee, nomination, instructions, guideline, added, print, Collecting, constituency, checklist, Know Your Booth Level Officer (BLO), Know the Status of Your Application for Enrolment, in Malayalam, democratic, special, register, verify, district election office, BLA, wrongly deleted, assistant election returning officers (AERO), Photo Identity Card, Is your name on the voters’ list, state, verification, verify, check, test, Enumerators, you can also find solutions to questions such as How do I get voter list of Trichirappali District, Tamil Nadu State, India? How will I enroll myself in the voters list? Registering fresh voters, deletion of names; getting voter id? In this post.
Bigrock is one of the popular domain registrar and hosting company among millions of hosting companies on the internet. They mainly focus on domain-name registration, windows and Linux hosting, WordPress , Joomla, Drupal hosting, e-commerce, Reseller , VPS and email hosting. They have individuals, small businesses and corporate plans backed by 24x7 supports.
Bigrock recently announced exciting offers for new domain name registration and hosting. It will provide up to 10% off on domain or website registration and 20% - 25% of web hosting. For this exciting offer you need to use coupon code given below at time of payment.
If you have any doubts in using coupon code watch video attached below.
Selecting the right hosting partner is essential to make your website always available on the net. Bigrock is one that you can trust and having best offers. So please don’t waste this opportunity.
Friends your support is valuable. Please don’t forget to follow my Facebook, Twitter and YouTube channels.
Basic sitemap is a web application that been developed to built xml sitemap. Sitemaps are considered as the simplest and easy way for webmasters to inform search engines about pages or content on their sites. It is capable of generating sitemap for WordPress, Tumblr and blogger blogs. These sitemap can be submitted to Google and Bing webmaster tools for indexing.
Working of Basic sitemap [ http://nvmk.github.io/BasicSitemap/ ] is very simple. Figure show the snapshot of basic sitemap. In the left site you can see a text box. User need to enter his or her blog address in this text box. The address entered should be complete. For example http://abc.xyzblog.com . User never forget to enter prefix http:// and avoid using country domains such as .co.in, com.om etc. Once the user entered the address of blog, press ‘generate sitemap’ button. Then it will automatically generate the link to sitemap.
This sitemap can be used to index search engine. You need only to copy this link and past to Google or Bing webmaster tools. This will direct search engine to index your recent post and updates.
Sometimes you may be running a YouTube channel and monetize YouTube
videos. Your YouTube channel may or may not have large number subscriber. Your earnings from YouTube video are directly proportional
to number of users playing them. If larger the number of videos, or larger the audience
then probably get decent earning.
Now in this tutorial I am going to explain
how to create an android application in simple steps for your YouTube
channel. You don’t need coding or
programming knowledge for this. First of all create an android application for
your channel means you are opening a new path that help you to get more audience.
So an android app helps you to earn more video views, subscribers and thus more
money. Apart from these benefits it will also help to reduce bounce back rate. Bounce
back rate is simply rate at which people go and watch videos uploaded by some
other users in YouTube after watching your YouTube video. So one key option to
increase income from YouTube is to reduce bounce back.
Now I am going to explain how to build android app for your YouTube
channel. It involves following steps:
Step 1: First you need to open website called AppsGeyser (http://appsgeyser.com).
[Figure below shows the snapshot of AppsGeyser home page]
Step 2: Once the site is completely loaded, you can see an
button (as in figure) say ‘CREATE APP NOW!’. Please click it.
Step 3: Now you are moved to an new page, which have
following options (figure below). Click ‘YouTube Video’ option from the list.
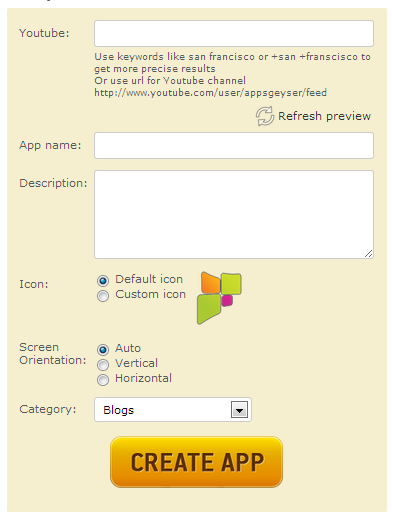
Step 4: Now you are directed to a page which have options to
create app (figure below).
b) Similarly fills your app name and description. Your app name can be
anything. I personally recommend you to choose your app name exactly same as
the YouTube channel so that user can identify easily from Google or AppsGeyser
store. And description means some explanation about your app.
c) Now browse your icon. You can upload images in jpeg or png for this
purpose. They also provide option to crop image.
d) Then you need to choose screen orientation. It is better to choose ‘Auto’.
e) After filling these details press ‘CREATE APP’ button in the bottom of form.
Step 5 : Now you reach an signup page (as figure below).
Fill all the required details and press ‘SIGN UP’.
Step 6 : Once you finish sign-up you are directed to
dashboard. Figure below show the snapshot of dashboard.
Here you can see code and link to download your android YouTube
app. This link can be copied and used in your blog or YouTube channel.
It is also possible to publish this app in Google Play. For
that you need to pay $25 (onetime payment) for Google. Once you publish app in Google
Play, you can also monetize the app itself.
That’s all you had finished building your application. If
you have any doubts in building android application please watch this video.
Friend please doesn’t forget to subscribe my YouTube channel. Also follow me on
Facebook and twitter.
In most browsers the password is displayed by black dots or
the asterisks. A visitor or the user can’t see this password. In this post I am
going explain a trick that will help you to find the hidden password.
Follow the steps below to reveal password.
Step 1 : Open any web browser and go to website login page. The browser will automatically fill
the password of the user. It is because of the ability of browser to remember username
and password. [ It also possible to disable this feature]. Here the password is
marked with black dots or stars.
Step 2 : Now right click mouse near to password box. When u
right click the mouse a new menu will be displayed. Please select ‘Inspect
Element’ from the menu.
Step 3: Now a developer tool open at bottom of browser.
In
the code section you can see type of password box is set to password.
Please double click type and change to text. Now your
password is revealed.
To know more please see this video. In this video I had
explained how to reveal password of yahoo account.
This trick will work in all kind of website. But never use
this trick for rough purpose. Friends before
leaving please follow me on twitter and Facebook page.
Update { Security Tips } : There are two solution to overcome finding of password from browsers.
1) Never store password inside web browser. 2) Use SMS protection for your account. To know more about free SMS protection please see http://youtu.be/kX625zOPHbw
Today I am going describe a quick
trick to book irctc tatkal ticket. Most of us make our long journey in train.
But it is very difficult to reserve ticket if the date of trip is too close to
booking day. In most case there will be no ticket. You may be probably put into
waiting list. The next option is to take tatkal ticket. Tatkal ticket booking
opens one day before the day of journey. That is if you are planning to go on
18th then the tatkal ticket for that opens for booking at 8 am 17th. But it is
also have very low probability to get ticket.
One reason for that is the online reservation system become slows with terrible
traffic when tatkal reservation starts. Secondly there is only limited number
of seats. Finally if booking page opens, you need to fill all the fields very
fast. But it is hard for even experts. So if you type fast has greater probability
to get ticket.
Here I am going to explain a
trick that will help you to automatically fill booking form. Hence you can
ensure ticket.
Step 1 - Downloading and install chrome
extension
First you need to open your
chrome browser. Then download extension called ‘Tatkal Ticket Autofill IRTC’
from chrome gallery. [Open Tatkal Ticket Autofill IRTC page in chrome gallery]. Inside the page you can see a light blue colour button 'ADD To CHROME'. Press this button to start download
Once download complete it will
automatically installed in chrome. Then close chrome and reopen or relaunch
chrome. It is needed to reopen chrome for proper functioning of extension.
Step 2 – Type and save passenger
details
Now open chrome browser. You can
see icon of ‘Tatkal Ticket Autofill IRTC’ at top right side of chrome as in
above image. Click that icon to open a passenger details page. This passenger
details page has close resemblance of that in irctc passenger reservation system.
Fill all the required fields and save it.
Step 3 – Booking ticket at irctc
website
Now go to irctc website and open
your account. Then choose to destination and source stations. It will automatically
provide list of trains available. Choose the one that you are looking for. Then
press book that appears in the new screen. It will automatically guide you to
booking page. Now it’s the turn of ‘Tatkal Ticket Autofill IRTC’ extension. It
will fill all the fields in booking page for you. Then you need to press Go
button at bottom of screen and provide your bank transaction details to finish
booking.
To know more watch this video. It
contains an example of booking ticket with ‘Tatkal Ticket Autofill IRTC’ extension.
Embeepay is a Facebook Application free
to use for all registered user of Facebook. Embeepay offers a free recharge for
you on any mobile. Embeepay currently supports 320 mobile operators in 100
countries. For enjoying Embeepay service we need to register. Once you
registered, Embeepay will pay you some embee points for every task you will do
on Embeepay and you can redeem those embee points in terms of top up prepaid
mobile recharge. The entire process is as follows:
3. Sign Up using your valid phone number, country
& carrier.
4. After Sign Up, you will get 50 Embeepay points.
5. Now click on Validate now & get more 50
Embeepay points by confirming your mobile number.
6. Now go to earn tab & click on Signup for Email
Alerts, verify you Email & you will get 50 point.
7. Now your Embeepay points will reach to 150.
8. Come back to Home tab, you will see "Share
Reward" under Feature Paycheck of 20 points.
9. Next step is to get more points by inviting your 5
friends. For inviting, go Friends tab> Invites.
10. When your five friends will be registered, Check
Rewards & claim your points.
11. Now go to Redeem tab & choose the Top up using
your points.
To get list of friends you accepted
your request, go to Friends>Invites> Click on Invite History (On top
right side). You will get the list.
Note
: The referred members must be in
your friend list otherwise you will not get points.
It is very simple. Now I am tableting
the points and corresponding recharge amount, it will help you to refill
mobile.
Point
Amount
150
$1 / Rs.50
300
$2 / Rs.100
500
$4 / Rs.200
800
$6 / Rs.300
So you got your first free mobile
recharge by doing above tasks but now what how to earn more free mobile
recharge. Embeepay have lots of sign up task such as survey, paid video
watching, daily visit points and other offers.
Embeepay gets money from advertisers
like for featuring their products and services on Embeepay and they share the
profit with Embeepay users. They also have connections with various mobile
wallets like super rewards, matey and Supersonic.
Embeepay is not scam. I have already
received two mobile top up recharge from Embeepay and yes they did have very
good support staff which will respond to your query via email so if you are
having any problem related to your account then send a email to support@embeemobile.zendesk.com.
As most
of us experienced, Google is redirecting blogs to country URL. For an example
consider blog address example.blogspot.com. If you are visiting this blog from
India you may redirected to example.bogspot.in. For some other user located in
Australia it will re direct to example.blogspot.com.au.
Google
do this to manage contents locally. They can now easily block entire blog or
some pages of blog. If they get a removal request, blog with violating content
can be blocked in that circle. To be more clearly, if some government bodies in
country X request Google to block blog, it can do the same under that country
URL. So example.blogspot.co.x is not available in that country X. But they are
available to all the visitors coming out of that country.
If
Google blocks, administrator of that blog get a notification email. And users,
who try to access the blocked content in the effecting area (i.e. inside
country X) sees a message showing this removal.
After
this change, hosting duplicate content on different domains can affect
search results. Crawlers will find and confused with Blog content on many
different domains even thought they are redirection of actual. It
will list all of them. It will adversely affect your blog
ranking, thus effect visitors. Visitors to the blog will reduce. It also
effects your earning, if you are afflicted to some ad publishing program other
than AdSense.
Two
solutions I like to share with you. First one is to use some custom URL. We can
choose either paid or free custom URL. If you are interested in paid URL, you
can get it from blogger itself or consult some domain registrars such as
godady.com. You can also choose free URL. Most popular free domain registrar is
dot.tk.
Secondly
method is cost effective and easy. It doesn’t force you to adopt an new domain
name. You need only to past an java script to your blog template. For that go
to your Blogger Dashboard (of the particular blog) and choose Template. Then
click the “Edit HTML” button followed by “Proceed.” Next, copy-paste following
code into template after <head> tag.
Click
the Save Template button and now your Blogger Blog will always serve with the
blogspot.com URL. It is very simple and 100% safe. It been already tested.
WAMP (Windows Apache Mysql PHP) is packages used in windows platform for testing or running web applications in developers computer or for deployment. It is a collection of independently-created programs like web server Apache, open-source database MySQL and one of the scripting language PHP, Perl or Python etc. It is also a free application available under General Purpose Licence (GPL). LAMP and MAMP are equivalent packages of WAMP for Linux and mac respectively.
For installing WAMP you need to install Microsoft Visual C++ 2010 Redistributable Package (MVC2RP). You need to do this because WAMP is written in visual c++. Unless you download and install (MVC2RP), you can't run WAMP. If you try to run WAMP without installling (MVC2RP), it will produce an error msvcr100.dll was not found. MVC2RP is a free package devoloped by microsoft. For download it please follow the links below.
Once MVC2RP is installed, you need to install WAMP.It is also an free application, that can be downloaded from wampserver.com. Once you downloaded WAMP please play video embedded below to know how to install wamp.
The NetBeans is an integrated development environment (IDE) written in Java. The NetBeans Platform is a reusable framework for simplifying the development applications Java, JavaScript, PHP, Python, Groovy, C, C++ etc. It is available for free under GPL licience for Windows, Mac OS, Linux, Solaris and other platforms. You can download it from netbeans.org. But its installation is slight different for windows and linux.
First we can look into installing netbeans in windows. For installing netbeans 7.1.2 you need to install Java Development Kit (JDK) first. It is also an free application by oracle systems. For downloading please click here.
Once you had downloaded JDK. Install it. I had added an video below which will help you to install JDK.
Then you can install netbeans. Please play the video below to know how to install netbeans.
Installing netbeans in windows is very simple. In case of installing netbeans linux there exit certain kind of complexity. Follow the steps below for installing netbeans in linux (Ubuntu):
Step 2 - Go to Netbeans.org and download the netbeans for Linux.
Step 3 - When downlod completed, copy Netbeans installer file to your Desktop.
Step 4 - Then you need to Open Terminal. To open terminal click the Dash home from unity launcher. And type terminal in the search field. And click Terminal.
Step 5 - When Terminal opens, type cd Desktop
Step 6 - Then type sudo chmod +x netbeans-*
Step 7 - Again type sudo ./netbeans-*
Step 8 - Then netbeans installer wizad appears. Then do as in windows installation.
Update: Netbeans suite is available for
windows, mac and Ubuntu. Please make sure that you are downloading right
package. If you download an non compactable package, you can’t install it. It
will show error when you do so. New version of Netbeans (version 7.3 beta 2) is
available at http://netbeans.org. You can
download it freely from there.