Showing posts with label Tutorial. Show all posts

How to verify & enroll your name, download PDF voter list

It is after a long interval I am writing a blog post. In this article, I am planning to explain how to check whether the voters list contain your name or not, how to locate polling station, how to enroll name to list and how to download complete voter list in single file. You have to check this because; if the voters list didn’t have your name you can’t vote in 16 th lok sabha election 2014. Some time you may vote previous election but it didn’t means the name is still there. Your name may or may not be deleted. So it is important to check voters list before the last date of enrollment. 

How to Check Status Via Online & Text Message

This year Indian election commission had provided two direct methods to check status of voter list of general election. This facility is already announced by chief election commissioner V S Sampath in election schedule declaration press meet. You can check voter list entry by yourself independent via online. For step by step instruction on detect voter list please watch this video.


Here you can search either by name, voters’ id, booth wise, district wise, state wise and assembly constitution wise. 

You can also check status through SMS. For message format and mobile number please see video below.


You can also check offline. You can get list of voters from panchayath or from touch screen placed at collectrat & taluk, or by visiting booth level officer (BLO).
 
You can also call toll free number 1950 of election commission for the same information.
 
If your name is not included in voters list please enroll your name as early as possible. For information on adding name at voters list please continue reading. (#link to add name to list)
 
Know Your Assembly Constituency
 
It is important to locate booth address or location before going to vote. To find your polling station please watch clip attached below.


How to Download Complete PDF Voter List
 
You can download PDF version (single file) of voters list contain details of entire voters of parliamentary poll in a particular both or legistrative assembly constitution or state or the entire country in local language. To know how please watch below embedded video.


How to Add Your Name in Voter List Online & Offline
 
Steps to add your name to voter list (e-registration) as follows.

2. Please enter your cellphone number and email id in this page.
 

guidelines for filling up indian election commisiioner voters list application form 6
3. Now you will receive text message contain verification code or one time password (otp) on your mobile.

new user registration & existing user login page of indian election commissionr
4. Once you receive SMS code open e-citizen service page.

5. In this new site you can see login form. Here you had to enter username and password that you receive at your phone.

6. Now you can see a form. Please fill it and submit.
Once your application submitted, Booth level officer (BLO) will download it and visit your residence or inform you to meet him o verify entries that you made.

Now the offline method. First you had to download application form 6 & fill it and submit it to ERO (Election Registration Officer).
 
If you don’t have photo election id card, you can get it along with this. You need only to mention you don’t have identity card in the application form.
 
You an also complaint errors and problem/issue with existing list and correct it along with new enrollment camp.
 
News & Updates
 
For new updates and news regarding assembly election please visit Facebook and twitter or election commission official website.
 
So I conclude that, All citizens of india have the right to cast their votes. So please utilize this opportunity and make you vote to right candidate. Remember that this is the change to decide who should lead india for next five years. We have Rahul Gandhi (for upa), Nerandra Modi (for bjp), aravind kajarwal (for aap) & jai lalitha as Prime Minister Candidates.
 
This time election start from april 6th and ends on may 12th. The vote counting & results will be declared on may 16th.
 
That’s all
 
Thank you for reading.
 
Friends please subscribe my YouTube channel as well as like Facebook page and follow me at twitter.

State list: Andhra Pradesh (AP), Punjab, Arunachal Pradesh, Rajasthan, Assam, Sikkim, Bihar, Tamil Nadu (TN), Goa, Tripura, Gujarat, Uttar Pradesh (UP), Haryana, West Bengal, Himachal Pradesh, Chattisgarh, Jammu & Kashmir, Jharkhand, Karnataka, Uttarakhand, Kerala, Andaman & Nicobar, Madhya Pradesh (MP), Chandigarh, Maharashtra, Dadra & Nagar Haveli, Manipur, Daman & Diu, Meghalaya, Delhi, Mizoram, Lakshadweep, Nagaland, Puducherry, Odisha         

Tag: voters, internet, net, web, shabha, Loka, saba, sabha, raj, raja, register, boot, find, look, search, electoral, rolls, where, how, trick, tips, tutorial, guideline, requirement, documents, claim, timing, date, day, last, rules, NRI, NRE, foreigners, parties, political, past, removed, reason, read, add, through, mob, information, details, info, vote, voter, drive, visit, process, steps, Indian, barath, bjp, congress, upa, officer, free, agent, fill, pune, shaba, elect, seat, seat, congress, election update, conference, event, Opinion, campaign, ceremonies, booklet, offer, full list, cpim, ldf, left democratic front, nominee, nomination, instructions, guideline, added, print, Collecting, constituency, checklist, Know Your Booth Level Officer (BLO), Know the Status of Your Application for Enrolment, in Malayalam, democratic, special, register, verify, district election office, BLA, wrongly deleted, assistant election returning officers (AERO), Photo Identity Card, Is your name on the voters’ list, state, verification, verify, check, test,  Enumerators, you can also find solutions to questions such as How do I get voter list of Trichirappali District, Tamil Nadu State, India? How will I enroll myself in the voters list? Registering fresh voters, deletion of names; getting voter id? In this post.

Basic Sitemap - automatic tool to generate xml sitemap for blogs

Basic sitemap is a web application that been developed to built xml sitemap. Sitemaps are considered as the simplest and easy way for webmasters to inform search engines about pages or content on their sites. It is capable of generating sitemap for WordPress, Tumblr and blogger blogs. These sitemap can be submitted to Google and Bing webmaster tools for indexing.

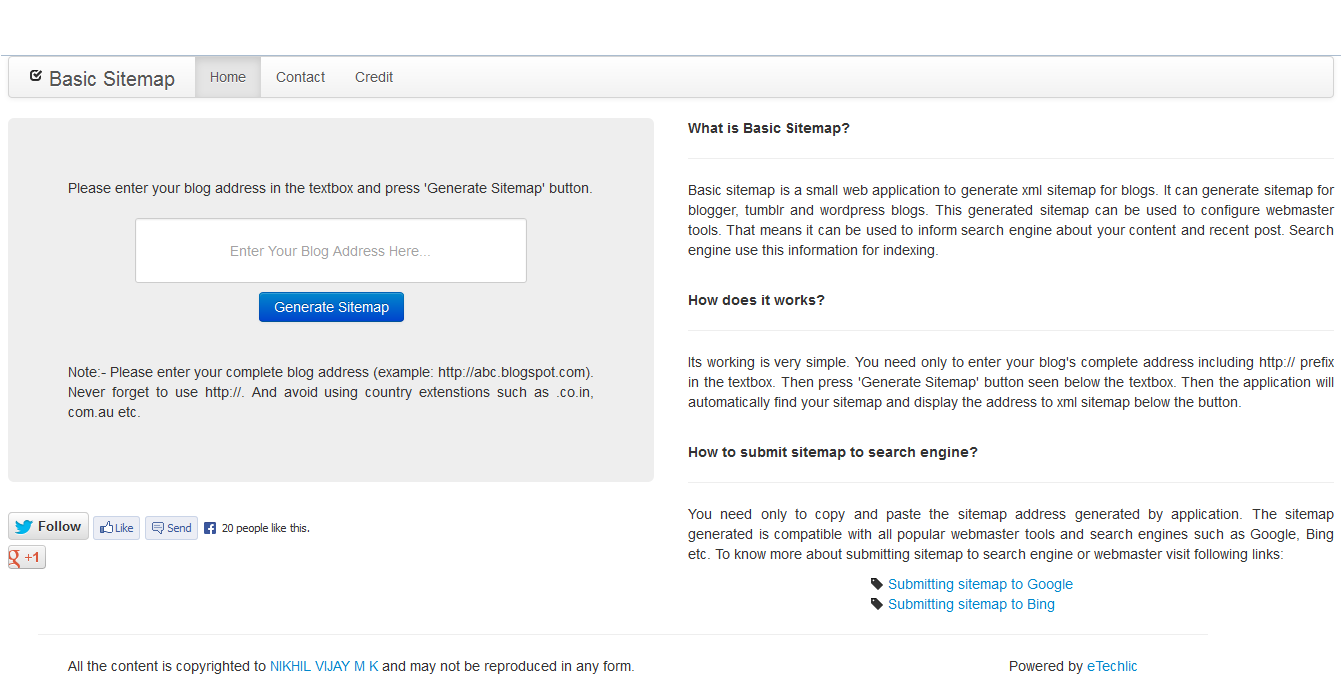
Basic Sitemap interface

Working of Basic sitemap [ http://nvmk.github.io/BasicSitemap/ ] is very simple. Figure show the snapshot of basic sitemap. In the left site you can see a text box. User need to enter his or her blog address in this text box. The address entered should be complete.  For example http://abc.xyzblog.com . User never forget to enter prefix http:// and avoid using country domains such as .co.in, com.om etc. Once the user entered the address of blog, press ‘generate sitemap’ button. Then it will automatically generate the link to sitemap.

This sitemap can be used to index search engine. You need only to copy this link and past to Google or Bing webmaster tools. This will direct search engine to index your recent post and updates
. 

Installing Wamp server in windows

WAMP (Windows Apache Mysql PHP) is packages used in windows platform for testing or running web applications in developers computer or for deployment. It is a collection of independently-created programs like web server Apache,  open-source database MySQL and one of the scripting language PHP, Perl or Python etc. It is also a free application available under General Purpose Licence (GPL). LAMP and MAMP are equivalent packages of WAMP for Linux and mac respectively. 

For installing WAMP you need to install Microsoft Visual C++ 2010 Redistributable Package (MVC2RP). You need to do this because WAMP is written in visual c++. Unless you download and install (MVC2RP), you can't run WAMP. If you try to run WAMP without installling (MVC2RP), it will produce an error msvcr100.dll was not found. MVC2RP is a free package devoloped by microsoft. For download it please follow the links below.


Download X86 (32bit) : Click here
Download X64 : Click here

Installing Wamp Server in Windows

Once MVC2RP is installed, you need to install WAMP.It is also an free application, that can be downloaded from wampserver.com. Once you downloaded WAMP please play video embedded below to know how to install wamp.

Installing netBeans 7.1.2 In windows and linux

The NetBeans is an integrated development environment (IDE) written in Java. The NetBeans Platform is a reusable framework for simplifying the development applications Java, JavaScript, PHP, Python, Groovy, C, C++ etc. It is available for free under GPL licience for Windows, Mac OS, Linux, Solaris and other platforms. You can download it from netbeans.org. But its installation is slight different for windows and linux. 

First we can look into installing netbeans in windows. For installing netbeans 7.1.2 you need to install Java Development Kit (JDK) first. It is also an free application by oracle systems. For downloading please click here.

Once you had downloaded JDK. Install it. I had added an video below which will help you to install JDK.


Then you can install netbeans. Please play the video below to know how to install netbeans.


Installing netbeans in windows is very simple. In case of installing netbeans linux there exit certain kind of complexity. Follow the steps below for installing netbeans in linux (Ubuntu):


Step 1 - To install JDK on ubuntu click here.

Step 2 - Go to Netbeans.org and download the netbeans for Linux.

Step 3 - When downlod completed, copy Netbeans installer file to your Desktop.

Step 4 - Then you need to Open Terminal. To open terminal click the Dash home from unity launcher. And type terminal in the search field. And click Terminal.

Step 5 - When Terminal opens, type cd Desktop

Step 6 - Then type  sudo chmod +x netbeans-*

Step 7 - Again type sudo ./netbeans-*

Step 8 - Then netbeans installer wizad appears. Then do as in windows installation.


Update: Netbeans suite is available for windows, mac and Ubuntu. Please make sure that you are downloading right package. If you download an non compactable package, you can’t install it. It will show error when you do so. New version of Netbeans (version 7.3 beta 2) is available at http://netbeans.org. You can download it freely from there.

Create windows 7 recovery disc

A recovery or restore disc is the common term used for media containing a backup of the original factory condition or system at particular state of a computer. A restore disc will help you to restore your system when any problem happens. In Windows 7, there have a inbuilt tool for creating backup. You may require one or more disc for the purpose.  If you are interested follow the steps below to create Windows 7 restore disc.

  • Go to start -> Control panel, Click on Back up your computer from System and Security category list.
Create Windows 7 Recovery Disc

  • Now in the new window on the left side you can see a button Create a System image, click on it.
Create Windows 7 Recovery Disc


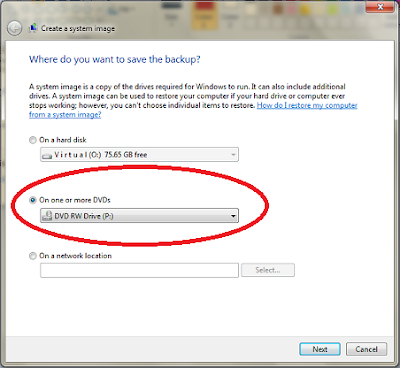
  • Now a new window pops. Click on radio button On one or more DVDs , and select the burning Rom. Press next. 


Create Windows 7 Recovery Disc

  • In the new window select the drives to backup and click next.

Create Windows 7 Recovery Disc

  • Now an confirmation window will appear, click start backup button at the button to start creating restoration disc. Once complete press OK.
Create Windows 7 Recovery Disc


Now when a problem hits your system. You need only to insert restoring disc and reboot the system. The you created is an boot-able disc. it will automatically start boot and show an menu. 

Create Windows 7 Recovery Disc

From the menu select System Image Recovery. Now it start fixing. It will complete with in few minutes.

Enjoy!!


Update: It is possible to back up the files to some drives of the same computer or to some portable devices like external hard disk pen drives etc.  I always prefer to create a recovery disc once my computer is installed. It will reduce my subsequent works. Thus I can save time. When I decide to format my pc, I just take the recovery discs and run them. I don’t want to install applications. All the needed applications will install along with it.

Make Gtalk idle always

Google Talk and chat gives freedom to talk anywhere and anytime with our online friends & family members for free. But When Google introduced chat & sms at Gmail, there was no way you could remain invisible from your Gtalk. Some people don’t like getting disturbed by some unwanted friend at some moment, but most them are forced for maintaining relations. Now I am going to explain how to force Gtalk to Idle status. So you can get ride of the unwanted moments.

G talk can be forced to idle using an application gAlwaysIdle. Its a free application, that can work safely in windows XP, vista, windows 7 etc. What you really need is only to download application.

Download gAlwaysIdle Free : Click here ( 45 Kb ) 


Make Gtalk Idle Always


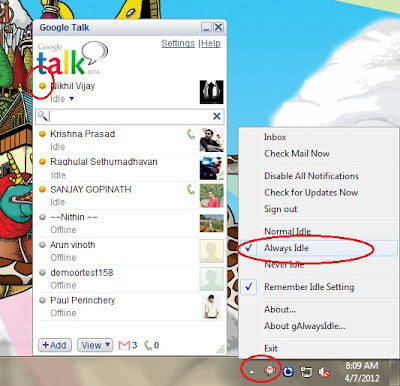
You will get a compressed file galwaysidle.zip . You need to extract that file. On extraction you get two files gidle.exe and gidle.dll. Now run gidle.exe either by double clicking or through open in right menu [make sure that g talk is running]. Then locate your g talk icon in notification area and right click over it appear a list. In the list you have the option always idle, normal idle, never idle. Click always idle , it will force g talk to idle status.

You Can play the video embedded below for more details.


100% tested
Enjoy!!

Related Post : Manually set Gtalk status to invisible and idle 


Update: If your system has antivirus or internet security programs, it may produce warning. More clearly when you extract downloaded zip file (galwaysidle.zip), your antivirus program will tell you gidle.exe as a malicious program. If so don’t use it. We never intention adds any trends in the file. But it may infect at storage. It was responsibility of third party storage partner to keep them away from infecting. Moreover we are not responsible of damages happen when you use this download document. [ So please make sure the program was free from virus before using it ]

Create Ubuntu boot stick

It is not needed to burn Ubuntu image file inorder to install it in your PC. Now it is possible to create boo-table Ubuntu pen-drive. That means you don't need to waste disc for this. For that you need following things:

  1. one USB stick or pen-drive with a least 2 GB free space,
  2. One copy of Ubuntu. If you don't have a copy [click here to download]
  3. And a third party software called 'UNIVERSAL USB INSTALLER' , used to create boo-table pen-drive [click here to download].
Once you have above things with you follow steps mention below to create boot stick:

Step 1: Open UNIVERSAL USB INSTALLER. Now you can see a window like below.

Create Ubuntu Boot Stick

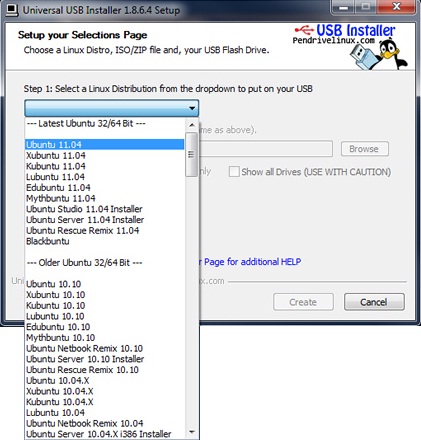
Step 2: Using drop menu select Ubuntu version.

Create Ubuntu Boot Stick

Step 3: Browse the ISO image of Ubuntu.

Create Ubuntu Boot Stick

Create Ubuntu Boot Stick

Step 4: Now select the USB drive. And press create.

Create Ubuntu Boot Stick

Now you had created boot stick. Now you can install Ubuntu using the boot stick. 

Enjoy!!

Update:  Canonical ltd had released new version of Ubuntu ( version 12.10) on 18 October 2012. It is also free. You can download Ubuntu desktop version from official site of Ubuntu (http://www.ubuntu.com ) or visiting following link http://www.ubuntu.com/download/desktop. You doesn’t need to pay for downloading. You can download both 32 bit and 64 bit pages. Please always make sure that you are downloaded correct package. I personally recommend you to download 32 bit package, since it also support 64 bit machine.  You are allowed to create any number of copies as you need and can be distributed. It is also possible to get source code of Ubuntu. You can modify Ubuntu as you like. It also available in cd or DVD. To get cd or DVD please visit Ubuntu shop or go to http://www.ubuntu.com/download/desktop . You need to pay for cd and DVD. 

Note: to know advantages of Ubuntu please see page http://shop.canonical.com/index.php?cPath=41

Create windows restore point


A restore point referred to the snapshot of environment and data of your computer at a specific time. System Restore utility is an unavoidable component of the all modern operating system. A restore point allows you to save the state of the operating system and your own data so that when a problem occurs, you can restore the system and your data to the way it was before the changes were made. It is very easy and simple to create a restore point. You need only to spend few minutes for this. The Steps you had to follow to create a restore point is as follows:


Step 1: Open 'System properties' by clicking the Start button, right-clicking Computer, and then clicking Properties.


Create Windows Restore Point


Step 2: Click the 'System Protection' tab in the left panel.


Create Windows Restore Point

Step 3: In the System properties menu you can see a 'create' option. Click Create.


Create Windows Restore Point

Step 4: Now a new dialog box will pops. Type a appropriate restore point name, that help you to identify it later. Here i typed to test.


Create Windows Restore Point

Step 5:  Press create. Then it will take few sec to create restore point.


Create Windows Restore Point


When a restore point is established, your computer actually creates a backup copy of all data at that particular time. It will help you to back your system to previous state when a problem occurs.

Update: If you run any third party softwares like cclean or use windows disk clean up software then the restore file will be deleted. So when you run such softwares please make sure that you had unchecked deletion of restore point. And it is also recommented to make restore point before shutdown the system each time or after major updates or software installation is carried out. Moreover backup option is different from that of restore option. Restore point saves just the state of the system not the files

Unlock Ubuntu password

This is a tutorial which help you steel Ubuntu password. Actually this article doesn't teach to steal password. But it can be extended. If you get an Ubuntu installed system and its password is not known to you. Then you cant able to access the data. The below mention method help you to reset the existing user password and make you able to access the user data.There are many reasons you might want to reset a password:

    1.Someone gave you a computer with Ubuntu installed on it but not the password for the user account.

    2.You just installed Ubuntu and forgot what password you selected during the installation process.

    3.You have too many passwords in your life and can't keep track of them all.

Steps to reset password

Step 1: First, you have to reboot into recovery mode. For that you need to restart your system. Then you can see a grub as below (for a computer having single operating system hold shift key to enter grub during booting)

ubuntu grub version 1.99


Step 2:  From the grub or boot menu, select recovery mode, which is usually the second boot option. Then you will be redirected to a screen called Recovery menu which is  similar to that given below.

ubuntu recovery menu


Step 3: Select Drop to root shell prompt option.

Step 4:  Now type ls /home in the below shell prompt

Step 5: Then type passwd <username> .where username is the username you want to reset. 

Step 6: Then we can see a line which ask new password. Here you had to enter the new password. Now we had rested the user password

Step 7: Then type to exit to quite the prompt  Then your system will restart and you can able to access user data.

Enjoy!!!


Update: This will be available on all versions of Ubuntu. It can also be used if Ubuntu is installed side by side

Detect earth quake


A sudden, violent shaking of the earth or volcanic action causing great destruction is termed as earthquake. The intensity of earthquakes is expressed by the Richter scale and its value lay between 7 and 9. Now it is possible for you to detect and measure earth quake using Apple products such as i phone, i pad or mac-book.

Commonly Seismograph is the device used to measure motion of earth’s crust. You can convert your apple products to a seismograph. For this purpose you had to use Safari browser on your iOS device and an chrome browser on mac-book. For converting your apple product to seismograph, please follow steps below.

Step 1:   Download and install Safari or chrome OS.

Step 2:   After installing please launch them.

Step 3:   Then you had to visit isthisanearthquake.com.

Step 4:   Now for testing please shake your device.

Step 5:   Once you stop shaking, you can see a graph showing shake.

Its working is very simple. Imagine that your device is placed on a flat, less mobile surface. Then if sudden, violent shake occurs it will detect this movement and produce corresponding graph. Apple product have a in built accelerometer, it will detect change in orientation of device and report to browser. Browser then interact isthisanearthquake.com and report change in orientation. Then isthisanearthquake.com will check whether the shake lies between 7 and 9 Richter scale. If yes, it will report an earthquake and produce graph. 

Note: -   isthisanearthquake.com makes use of a JavaScript to produce graph. This script works with chrome and safari only. So please make use of above browsers.

Update: This feature work more efficiently in i phone 5 than that of i phone 4SE or 4.

All I Phone users kindly test this feature. It’s real. I had already tested this feature. 100% working.

Make your own Chrome-book


On July 15, Samsung and Acer will release the first Chrome-book at around $400. Laptop and Chrome-book have similar hardware architecture. Then why you had waste $400 for purchasing a new Chrome-book.

It is very easy to create a Chrome-book. Here I am going to explain simple steps to build Chrome-book. For this you requires following items.

1. A laptop or notebook.
2. A 2GB USB Memory stick.
3. Grab a copy of Chrome OS. It is possible for you to download Google chrome image from Hexxeh for free.
How to create chromebook?

Once you collected all the required items please follow the steps below to build Chrome-book:
1.    Once you download Chrome OS, burn image into your memory stick.

2.    Then plug your USB memory stick and restart your system. (Make sure that your computer is set to boot from USB.)

3.    After 8 seconds, you should be greeted with a login screen. If a network connection has been detected Wifi or Ethernet, you will able to continue to login screen. Enter your normal Google account credentials and press Enter.

4.    Then, hit Ctrl + Alt + T , which will bring up a diagnostic type terminal screen.

5.    Then, type shell and press Enter. Type /usr/sbin/chromeos-install and press enter. If prompted for a password, use facepunch. When installation completed, reboot your system after removing memory stick.

(If you try these steps you can save money. You can also participate chromium project. Google Chromium is an open source project. Google Chrome browser is developed under Chromium project. Google Chrome was one of the fast growing web browsers. It captured majority of market. Google Chrome can load pages faster than all other browsers that make it powerful. And it is very simple and free. You can download it from https://www.google.com/intl/en/chrome/browser/ .)

Tested and proved.
Enjoy

Create your own multi Linux boot stick


Linux is name for its freedom and experimenting. Most of the open source operating system is capable of testing its environment without actual installation, called ‘Live CD’. With ‘Live CD’ facility today you don’t need to burn disc to try out a new Linux distro. Using a couple of tools you can create a bootable Linux stick. Here I am going to explain tool say Yumi. It is a free tool.

What you need?


1. Live CD image of the distros you want
2. Yumi Multiboot USB creator. Yumi supports well known distributions such as Ubuntu, Knoppix and Pclinux. For download Yumi go to http://www.tinyurl.com/digit-yumi
3. UBS drive

How to make your own multi boot stick?

Yumi closely resembles an installer. After downloading Yumi follow steps written below

Step 1: Run Yumi Multiboot USB creator.

Step 2: On the first screen you’ll have to accept a license agreement.

Step 3: Next, Select USB drive using its drive letter.

Step 4: Click on the browser button, and select the distribution you are using.

Step 5: Select iso image of Linux distro. If you haven’t already downloaded the image of Linux distro you want Yumi can do it for you!

Step6: Once done, Yumi asks you whether you want to add another Linux distribution from list. You either say ‘yes’ or run the program again later and do steps 1 to step 3 and press create Live CD.

(If don’t have images of Linux operating system you can download them from respective manufactures site. In most case it has a size of 600 to 1500 MBs. Moreover you can make any number of copies of downloaded image and can distribute them legally. You can also get source code of them. Using this you build your own system or can modify them. For building your own system or updating you should have some knowledge about system programing and compilation)