Showing posts with label tips_tricks. Show all posts

How to verify & enroll your name, download PDF voter list

It is after a long interval I am writing a blog post. In this article, I am planning to explain how to check whether the voters list contain your name or not, how to locate polling station, how to enroll name to list and how to download complete voter list in single file. You have to check this because; if the voters list didn’t have your name you can’t vote in 16 th lok sabha election 2014. Some time you may vote previous election but it didn’t means the name is still there. Your name may or may not be deleted. So it is important to check voters list before the last date of enrollment. 

How to Check Status Via Online & Text Message

This year Indian election commission had provided two direct methods to check status of voter list of general election. This facility is already announced by chief election commissioner V S Sampath in election schedule declaration press meet. You can check voter list entry by yourself independent via online. For step by step instruction on detect voter list please watch this video.


Here you can search either by name, voters’ id, booth wise, district wise, state wise and assembly constitution wise. 

You can also check status through SMS. For message format and mobile number please see video below.


You can also check offline. You can get list of voters from panchayath or from touch screen placed at collectrat & taluk, or by visiting booth level officer (BLO).
 
You can also call toll free number 1950 of election commission for the same information.
 
If your name is not included in voters list please enroll your name as early as possible. For information on adding name at voters list please continue reading. (#link to add name to list)
 
Know Your Assembly Constituency
 
It is important to locate booth address or location before going to vote. To find your polling station please watch clip attached below.


How to Download Complete PDF Voter List
 
You can download PDF version (single file) of voters list contain details of entire voters of parliamentary poll in a particular both or legistrative assembly constitution or state or the entire country in local language. To know how please watch below embedded video.


How to Add Your Name in Voter List Online & Offline
 
Steps to add your name to voter list (e-registration) as follows.

2. Please enter your cellphone number and email id in this page.
 

guidelines for filling up indian election commisiioner voters list application form 6
3. Now you will receive text message contain verification code or one time password (otp) on your mobile.

new user registration & existing user login page of indian election commissionr
4. Once you receive SMS code open e-citizen service page.

5. In this new site you can see login form. Here you had to enter username and password that you receive at your phone.

6. Now you can see a form. Please fill it and submit.
Once your application submitted, Booth level officer (BLO) will download it and visit your residence or inform you to meet him o verify entries that you made.

Now the offline method. First you had to download application form 6 & fill it and submit it to ERO (Election Registration Officer).
 
If you don’t have photo election id card, you can get it along with this. You need only to mention you don’t have identity card in the application form.
 
You an also complaint errors and problem/issue with existing list and correct it along with new enrollment camp.
 
News & Updates
 
For new updates and news regarding assembly election please visit Facebook and twitter or election commission official website.
 
So I conclude that, All citizens of india have the right to cast their votes. So please utilize this opportunity and make you vote to right candidate. Remember that this is the change to decide who should lead india for next five years. We have Rahul Gandhi (for upa), Nerandra Modi (for bjp), aravind kajarwal (for aap) & jai lalitha as Prime Minister Candidates.
 
This time election start from april 6th and ends on may 12th. The vote counting & results will be declared on may 16th.
 
That’s all
 
Thank you for reading.
 
Friends please subscribe my YouTube channel as well as like Facebook page and follow me at twitter.

State list: Andhra Pradesh (AP), Punjab, Arunachal Pradesh, Rajasthan, Assam, Sikkim, Bihar, Tamil Nadu (TN), Goa, Tripura, Gujarat, Uttar Pradesh (UP), Haryana, West Bengal, Himachal Pradesh, Chattisgarh, Jammu & Kashmir, Jharkhand, Karnataka, Uttarakhand, Kerala, Andaman & Nicobar, Madhya Pradesh (MP), Chandigarh, Maharashtra, Dadra & Nagar Haveli, Manipur, Daman & Diu, Meghalaya, Delhi, Mizoram, Lakshadweep, Nagaland, Puducherry, Odisha         

Tag: voters, internet, net, web, shabha, Loka, saba, sabha, raj, raja, register, boot, find, look, search, electoral, rolls, where, how, trick, tips, tutorial, guideline, requirement, documents, claim, timing, date, day, last, rules, NRI, NRE, foreigners, parties, political, past, removed, reason, read, add, through, mob, information, details, info, vote, voter, drive, visit, process, steps, Indian, barath, bjp, congress, upa, officer, free, agent, fill, pune, shaba, elect, seat, seat, congress, election update, conference, event, Opinion, campaign, ceremonies, booklet, offer, full list, cpim, ldf, left democratic front, nominee, nomination, instructions, guideline, added, print, Collecting, constituency, checklist, Know Your Booth Level Officer (BLO), Know the Status of Your Application for Enrolment, in Malayalam, democratic, special, register, verify, district election office, BLA, wrongly deleted, assistant election returning officers (AERO), Photo Identity Card, Is your name on the voters’ list, state, verification, verify, check, test,  Enumerators, you can also find solutions to questions such as How do I get voter list of Trichirappali District, Tamil Nadu State, India? How will I enroll myself in the voters list? Registering fresh voters, deletion of names; getting voter id? In this post.

Bigrocks Domain and Hosting Discount Coupon

Bigrock is one of the popular domain registrar and hosting company among millions of hosting companies on the internet. They mainly focus on domain-name registration, windows and Linux hosting, WordPress , Joomla, Drupal hosting, e-commerce, Reseller , VPS and email hosting. They have individuals, small businesses and corporate plans backed by 24x7 supports.

Bigrock recently announced exciting offers for new domain name registration and hosting. It will provide up to 10% off on domain or website registration and 20% - 25% of web hosting. For this exciting offer you need to use coupon code given below at time of payment.

bigrocks crack and hack trick


If you have any doubts in using coupon code watch video attached below.


Selecting the right hosting partner is essential to make your website always available on the net. Bigrock is one that you can trust and having best offers. So please don’t waste this opportunity.

Friends your support is valuable. Please don’t forget to follow my Facebook, Twitter and YouTube channels.

Basic Sitemap - automatic tool to generate xml sitemap for blogs

Basic sitemap is a web application that been developed to built xml sitemap. Sitemaps are considered as the simplest and easy way for webmasters to inform search engines about pages or content on their sites. It is capable of generating sitemap for WordPress, Tumblr and blogger blogs. These sitemap can be submitted to Google and Bing webmaster tools for indexing.

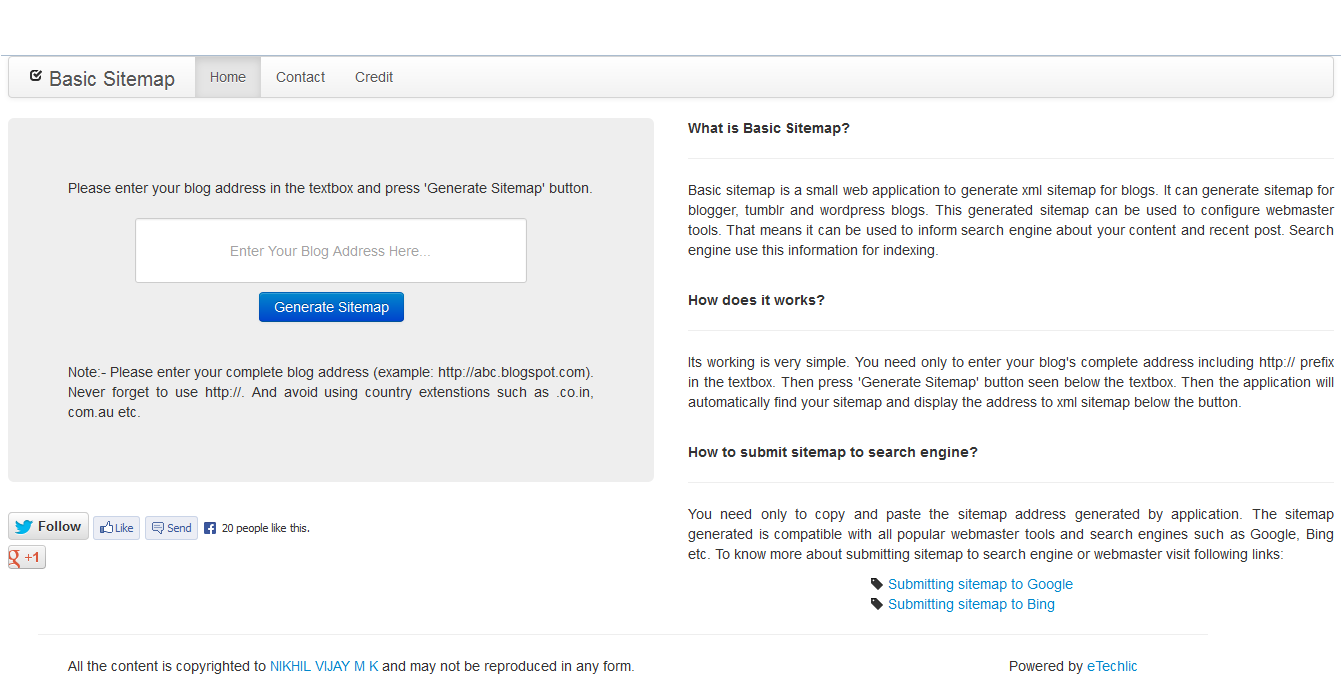
Basic Sitemap interface

Working of Basic sitemap [ http://nvmk.github.io/BasicSitemap/ ] is very simple. Figure show the snapshot of basic sitemap. In the left site you can see a text box. User need to enter his or her blog address in this text box. The address entered should be complete.  For example http://abc.xyzblog.com . User never forget to enter prefix http:// and avoid using country domains such as .co.in, com.om etc. Once the user entered the address of blog, press ‘generate sitemap’ button. Then it will automatically generate the link to sitemap.

This sitemap can be used to index search engine. You need only to copy this link and past to Google or Bing webmaster tools. This will direct search engine to index your recent post and updates
. 

Manually set Gtalk status to invisible and idle


Google talk was one of the world popular applications that provide both text and voice messaging service.  In its initial version we have both invisible and idle mode. These modes can be manually selected by user. But 2-3 years back, Google remove this option. Today G talk doesn't allow user to select Invisible or Idle status manually. That means there was no way you could remain invisible from your G talk  But in many instance people don’t like get disturbed. Now in this post I am going to explain a method that will help you to manually select Idle or Invisible mode.

This can be done using another instant messenger called nimbuzz. It is also a free application that has additional capability to run in mobiles. Follow are typical steps that a user should go to make G talk idle using nimbuzz.

Step 1 : First, you need to download nimbuzz application if you don’t have one. You can download it from nimbuzzofficial website.

Step 2 : Once the download finishes install nimbuzz. This installation procedure is very simple like any another application.

nimbuzz starting window


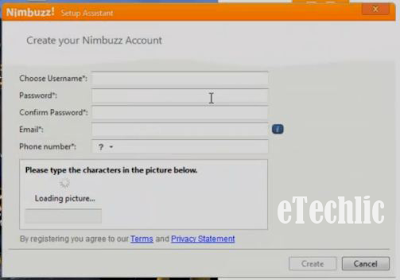
Step 3 : Open nimbuzz after installing. In the welcome screen (as above image) you can see a link to create an account. When you click it, a new registration window will appear. In this window you need to enter some details. Enter them properly and clicks create.

nimbuzz setup assistance

Step 4 : Now you are requested to give your Gmail mail id and password. Enter them correctly and press connect. After successfully connect your account press next.

connecting nimbuzz with google talk

Step 5 : Now you are directed to new window. In this window you can see a finish option at bottom. Click it.

nimbuzz personal preferences configuration

Step 6 : Now you had configured nimbuzz successfully. Now you can see a list at the top. In this list you have several statuses such as invisible, Idle (away), busy and available. Select any of the modes that you like. For example if you select invisible, none of your friends came to know you are online, while you can connected. You can also message or go for voice chat with your favourite person in invisible mode.

nimbus status list with online busy invisible

For more details see this video  


Before leaving this page please follow me on Facebook and twitter.

Related Post : Make Gtalk Idle Always

Free mobile recharge using facebook

Embeepay is a Facebook Application free to use for all registered user of Facebook. Embeepay offers a free recharge for you on any mobile. Embeepay currently supports 320 mobile operators in 100 countries. For enjoying Embeepay service we need to register. Once you registered, Embeepay will pay you some embee points for every task you will do on Embeepay and you can redeem those embee points in terms of top up prepaid mobile recharge. The entire process is as follows:

1.     Login to your Facebook account.
2.     Go to Embeepay application by clicking here
3.     Sign Up using your valid phone number, country & carrier.
4.     After Sign Up, you will get 50 Embeepay points.
5.     Now click on Validate now & get more 50 Embeepay points by confirming your mobile number.
6.     Now go to earn tab & click on Signup for Email Alerts, verify you Email & you will get 50 point.
7.     Now your Embeepay points will reach to 150.
8.     Come back to Home tab, you will see "Share Reward" under Feature Paycheck of 20 points.
9.     Next step is to get more points by inviting your 5 friends. For inviting, go Friends tab> Invites.
10.   When your five friends will be registered, Check Rewards & claim your points.
11.   Now go to Redeem tab & choose the Top up using your points.

To get list of friends you accepted your request, go to Friends>Invites> Click on Invite History (On top right side). You will get the list.

Note : The referred members must be in your friend list otherwise you will not get points.

It is very simple. Now I am tableting the points and corresponding recharge amount, it will help you to refill mobile.

    Point                  Amount    
  150                  $1 / Rs.50
    300                  $2 / Rs.100
    500                  $4 / Rs.200
    800                  $6 / Rs.300

So you got your first free mobile recharge by doing above tasks but now what how to earn more free mobile recharge. Embeepay have lots of sign up task such as survey, paid video watching, daily visit points and other offers.

Embeepay gets money from advertisers like for featuring their products and services on Embeepay and they share the profit with Embeepay users. They also have connections with various mobile wallets like super rewards, matey and Supersonic.

Embeepay is not scam. I have already received two mobile top up recharge from Embeepay and yes they did have very good support staff which will respond to your query via email so if you are having any problem related to your account then send a email to support@embeemobile.zendesk.com.

Prevent blogger blog redirection


As most of us experienced, Google is redirecting blogs to country URL. For an example consider blog address example.blogspot.com. If you are visiting this blog from India you may redirected to example.bogspot.in. For some other user located in Australia it will re direct to example.blogspot.com.au.


Google do this to manage contents locally. They can now easily block entire blog or some pages of blog. If they get a removal request, blog with violating content can be blocked in that circle. To be more clearly, if some government bodies in country X request Google to block blog, it can do the same under that country URL. So example.blogspot.co.x is not available in that country X. But they are available to all the visitors coming out of that country.


If Google blocks, administrator of that blog get a notification email. And users, who try to access the blocked content in the effecting area (i.e. inside country X) sees a message showing this removal.


After this change, hosting duplicate content on different domains can affect search results. Crawlers will find and confused with Blog content on many different domains even thought they are redirection of actual. It will list all of them.  It will adversely affect your blog ranking, thus effect visitors. Visitors to the blog will reduce. It also effects your earning, if you are afflicted to some ad publishing program other than AdSense.

Two solutions I like to share with you. First one is to use some custom URL. We can choose either paid or free custom URL. If you are interested in paid URL, you can get it from blogger itself or consult some domain registrars such as godady.com. You can also choose free URL. Most popular free domain registrar is dot.tk.


Secondly method is cost effective and easy. It doesn’t force you to adopt an new domain name. You need only to past an java script to your blog template. For that go to your Blogger Dashboard (of the particular blog) and choose Template. Then click the “Edit HTML” button followed by “Proceed.” Next, copy-paste following code into template after <head> tag.


remove blog redirection

Click the Save Template button and now your Blogger Blog will always serve with the blogspot.com URL. It is very simple and 100% safe. It been already tested.

Free Microsoft portable USB antivirus

This story is about anti-virus, a program that heal malicious program. Most of the virus prevents installing anti-virus on infected system. If such a situation occurs most users format their system and install a new copy of window. It might lead to losing your data and waste your valuable time. For an organisation or even for individual it is very painful act. Here I am going to explain a solution too this problem.

Microsoft safety scanner is a security tool developed by Microsoft, which can be used to check presence of malicious program in a system. It is portable program that can copy in a pen drive. It can work even a virus is present.  Moreover it is compatible with windows 7, Vista, XP. And never perform genuine test. So it safe to used by any kind of windows user. Follow link below to download Microsoft Scanner.


You won’t pay anything for this. It is absolutely free. Once the program is downloaded, copy it to some portable device like pen drive, disc, portable HDD etc. Plug the device in infected device. Then locate file msert.exe. Double click and start the program.

Free Microsoft Portable USB Anti-Virus

You can select either through scan or quick scan. A through scan will check every file and folder in the system. So it is a time consuming process. You can go for an quick scan, it will help you to save time. During scanning process if an problem or infected program is found, it will be automatically quarantined.

Another important thing is that Microsoft Scanner is valid for ten days. After 10 days of download it get expired. But you can download a number of copies at any time for free.

100% tested
Enjoy!!

Update:  Now Microsoft scanner for x64 and x32 are available. While download please make sure you are downloading proper package. To know system requirement for installing Microsoft scanner please visit http://www.microsoft.com/security/scanner/en-us/default.aspx


Free sms @ Airtel, Reliance, Docomo, Videocon


You can send local, national, international sms free using Twitter. It was because of the aggregation between Twitter and mobile provider that allows free sms from and to Twitter. Developers introduce this feature to notify its user about the events. But it is very easy to bypass this option and to send free sms to our friends. To enjoy this, both you and your friend should have an twitter account plus a mobile connection that supported by Twitter like Airtel, Reliance, Docomo, Videocon etc. To send free sms follow the steps below:


Free Sms @ Airtel Reliance  Docomo


1. If you don't have a twitter account please create one.

2. Open your twitter account and add your mobile number. You can add mobile number using the link  https://twitter.com/settings/devices. Add number and press active phone.

3. Now verify your mobile number. For that you need to send a sms with keyword 'GO' to 53000. Twitter or mobile  providers  (other than Gulf countries) doesn't charge for this.

4. Once your mobile number is verified, you and your friend should follow each other. Now you can start sending messages. The format to send message is

@<frends twitter id> <your msg> to 53000


For example, you want to send message 'HI, how are u’ to your friend abin (twitter id: abin758), type 

        @abin758 Hi,How are u

in your mobile and send it to 
53000
Then your friend will immediately receive it as

Hi, How are u

Note: The maximum length of message that can be send is 140. And you can send any number message a day.

Update:  If any of the user register at DNT service, the sms may not receive. And you can’t send sms after 9pm and before 8am. That means you can’t send messages for 11 hours (That is from 9pm to 8am). Moreover in peak hour time it may experience delay.


Generate strong security code

We all are families with passwords, they are similar as the key to open the door. Secret word or string is used for authentication, to prove identity or gain access to a resource. So they should be kept safer and make it unpreditable. Here I specify steps that help you to create a strong password. Some or all might help to protect your online transactions:
  1. Choose a password having lenght more than eight characters.
  2. You should include both capital and small letters, punctuation, symbols, and numbers.
  3. To keep strong passwords effective, change them often.
  4. Don't use the same password for everything.
  5. Avoid common password pitfalls like including dictionary words, Words spelled backwards, common misspellings, and abbreviations, Sequences or repeated characters( Examples: 12345678, 222222, abcdefg), or adjacent letters on your keyboard, Personal information etc.

Even you had followed steps noted above, you may have a doubt that the password that you choose is strong or not. For this you can make use of a password checker, that are freely avalilable in web, which evaluates your password's strength automatically. One of the most poppular is a checker generated by microsoft.

Update:
 You need to choose strongest password always. Even though you can choose passwords like Grgh&gl878hHii. It is strong one. But now we have an option of onetime password. Some examples of one time random password is Google verification2, yahoo verification, outlook onetime password etc. In all this case you combines both password and verification sms code. In a typical user section, user enters username and password at login box. Once user submits authentication information, it will send a sms. This sms contain 5 or 6 digit code. It is unique code. Then you need to input this code. When you successfully enter onetime code you are allowed to use resource

Create windows restore point


A restore point referred to the snapshot of environment and data of your computer at a specific time. System Restore utility is an unavoidable component of the all modern operating system. A restore point allows you to save the state of the operating system and your own data so that when a problem occurs, you can restore the system and your data to the way it was before the changes were made. It is very easy and simple to create a restore point. You need only to spend few minutes for this. The Steps you had to follow to create a restore point is as follows:


Step 1: Open 'System properties' by clicking the Start button, right-clicking Computer, and then clicking Properties.


Create Windows Restore Point


Step 2: Click the 'System Protection' tab in the left panel.


Create Windows Restore Point

Step 3: In the System properties menu you can see a 'create' option. Click Create.


Create Windows Restore Point

Step 4: Now a new dialog box will pops. Type a appropriate restore point name, that help you to identify it later. Here i typed to test.


Create Windows Restore Point

Step 5:  Press create. Then it will take few sec to create restore point.


Create Windows Restore Point


When a restore point is established, your computer actually creates a backup copy of all data at that particular time. It will help you to back your system to previous state when a problem occurs.

Update: If you run any third party softwares like cclean or use windows disk clean up software then the restore file will be deleted. So when you run such softwares please make sure that you had unchecked deletion of restore point. And it is also recommented to make restore point before shutdown the system each time or after major updates or software installation is carried out. Moreover backup option is different from that of restore option. Restore point saves just the state of the system not the files

Web based project management tools


When your business starts to grow, there will come a time to hire staff, assistants to assist with your day-to-day operations. Whatever your circumstances, having the ability and tools to manage your projects effectively will be an important factor in the success of your business. Traditional project management tools include Gantry charts and highly detailed project schedules. They are complex and less flexible. But today’s web-based project management software tools are capable of offering much more than these traditional methods of monitoring projects. It allow a members of the team to access the tools and interact with other project members online. Some of them are:


TWproject (twproject.com)


TWproject is a simple, friendly and reliable web-based project and groupware management solution published by Italian software house ‘Open Lab’. It was a perfect flexible solution for your business ranging from micro to blue chip enterprises. It comes with several features such as project planning, task management, time tracking, document management and bug tracking.

twproject dasboard reviews


It has a beautiful dashboard. You can find your project’s overview there. This overview contains information such as upcoming deadline, event progress outlines, resource allocation, logs and expenditure. It also comes with an easy to grab interactive Gantt chart.

The basic principle that every project lead adopts is to complete project with limited inexpensive as well as non-excessive resource. TWproject team is well aware of this principle. They provide interactive workload and plan view which allows project manager to provide resource based on its availability.

From the point of view of team member, agenda screen was a blessing. It allows them to check their work load, share agendas and files, communicate and prioritize their tasks. It keeping everyone connected.

It also allows project team to attach document. These attachments can be downloaded later. Moreover it allow user to connect folder(s) to a project in single click. It is really a wonderful feature that I like. 

I had tested much project management software. Some of the tested project management solutions are tested below. From this experience, without any doubt I can say TWproject is distinct from all of this. Because it is very simple. It is very easy to understand. Some project management solutions that I tested provides complex options, which are hard to understand. Users may consume large portion of time to study these options itself. 

You can either install Twproject on your server or get your dedicated service on Amazon cloud. TWproject is available for windows, linux, mac and It’s installation procedure is simple and easy. Price of TWproject local version ranges from 3.75 € to 1.5 € a month. For amazon version the price ranges from 31 € to 403 € a month. Moreover they also offer a 15-day free trial period. A detailed price chat is attached below.

price chart for twproject


It supports multiple languages such as English, German, French, Italian, Portuguese, Spanish, Chinese and Japanese. TWproject team still works hard to introduce more languages. Apart from all of these, most attractive thing is 24x7 customer support. Customer care executives are well experienced and reliable. They also provide basic course for beginners at lowest price. So try it. It is precious. 

Basecamp


Basecamp by 37signals is one of the most popular tools for managing projects online. Projects can be managed through a shared dashboard, complete with the ability to upload and share files, send messages, document milestones, create to-do lists, and track time spent on projects.


One of the benefits of Basecamp is its friendly user interface. It can also be synced with other 37signals tools like Highrise for managing your contacts, Backpack for organizing your business, or Campfire for chatting with group members.


Basecamp is a good option for those looking for a friendly project management interface and collaborative elements.


ActiveCollab


ActiveCollab is another popular project management and collaboration tool suited to both small businesses and corporate  One feature of ActiveCollab that appeals is the ability to set up the software on your own server. This feature will allow your business to have greater control over its activities.


ActiveCollab provides good documentation on using the software from the perspective of a user, administrator, or developer. It also has an Invoice module as part of its tool.


ActiveCollab is a solid solution for those who want to have greater control over their project management software.


Central Desktop


Central Desktop has all the essential features of a web-based project management tool – the ability to manage projects, share online documents, and tools for team work (e.g., create Wikis, blogs, and forums). For an additional monthly fee, it also provides a service to host online web meetings and conferences. Plans range from a free option up to an enterprise solution. Date storage is limited for the free plan or low monthly plans.

Central Desktop would be a good project management choice for businesses who want extra features like online web meetings.


There a extensive range of project management software tools available on the market, each with its own particular range of benefits and features. It is not easy to select one. Most project management tools provides all common services. It is better to choose the basic plan and upgrades your project management software accordingly changing business requirements


Project Manager (ProjectManager.com)

I have used quite a few different project management packages. Few of them are noted above. They all offer the basic set of functionality and some have a few additions. But most friendly project management system that I had found is Project Manager (projectmanager.com). It is one of the popular online project management software that even used by NASA for their Mission to Mars project. 

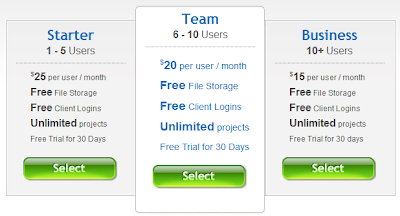
As for any other website, you need to create an account to use Project Manager.  Figure below shows various tariff plans for Project Manager.

Tariff plans of Project Manager

You can also create a trail (valid for 30 days) account without paying. If you don’t have an account, please Sign-Up now.

Once I completed the registration, I had logged in the Project Manager (PM). My expectation about Project Manager is that, it’s just another project management system. I don’t expect anything new there. But once I logged in, the very first thing that attracted me their interface. Compared to all other project management system that I use, Project Manager Interface is pretty slick and well-arranged. They give all the necessary start-up options in a single window. They have personalized dashboard. It’s something that I haven't expected. There are different options to create projects, open existing projects, import and exporting projects, administrative options etc., I am sure that, even for a person who is not familiar with any kind of project management system can use this software easily. It will have a minimal learning curve.

I strongly believe that, Project Manager is the one promising scalable software for business managers and teams.  As I mentioned above it have a variety of options.  For your convenience I had attached a video below. In this video I will go through almost all options. So please watch it. It will help you to get an idea of Project Manager.


I think the reason behind the wide success of the Project Manager is because of the easy to use, fair pricing, issue or risk tracking options and multi-lingual support. It also provides features like resource management, scheduling etc., Compared to all other online project management system, its processing is smooth. It requires minimum time to load pages. At the same time it is flexible and can be used to manage numerous projects from multiple devices across geographically dispersed locations. So it’s an added feature for the team having members from multiple locations. In addition to all this Project Manager provides good volumes of education and training for users.

But it also has some drawbacks such as forecasting features, document workflow tracking and have no apps for android and windows 8 devices. However, Project Manager is an online service; users can get new features as soon as they are released. 


ProjectPlan (projectplan.com)

Another project management application that I had used is the Project-Plan.  It is one of the fastest growing online project management software. It has a huge volume of customers all over the world.  It been used by blue-chip Company, government and private organization like Volvo, Admirals bank, Fujitsu, Metropolitan Police Department (MPDC), Boeing, Telecom, US Defense, Horizon Power, World vision, Federal Aviation Administration Bureau etc. 

If you are looking for an online project planning tool, then this is the right one that you can use. It is very flexible. It helps to plan project regardless of your industry. It can also accommodate multidimensional projects. To be more clear, you can use your account to plan and manage construction of the house, managing an IT project or running a business.

Project planning step is the first and most important step behind all successful projects. Applications like Project-Plan which helps you to do this planning. It comes with all the necessary features and tool, which helps you to build project plans, create tasks, scheduling each step, assign work to people, adding milestones, creating notes, track project status and issues.

All the users first try to create a plan. Creating project plan is very simple in projectplan.com. It has all the options to create flexible, consistent and multi-user plans without consuming much time. As already mention it can manage multi-dimensional projects. Your project may be small or large, or it may take one week or many years to complete. But you need only the same project managing system to track, share and analysis your project.  

If you already created a plan in Microsoft Project, Excel or Word, can be imported very easily which help to save re-entering time. It also includes all the features that found in Microsoft Project in much smarter and more convenient way. All the options are well arranged and customized based on user interest, so that you can see them quickly. Because of this higher order customization you can plan your project even within minutes.

Project task list in projectplan.com

Its task managing capabilities help you to define various tasks that to be done in your project and schedule their starting and ending days. It also helps you to calculate, allocate resources and wrap your tasks together. It allows user to create detailed lists of task in a single page. It also supports task hierarchies. Task hierarchy is one feature that I never found on any other project planning tools. The user can first enter their project tasks and later "Indent" feature to create a hierarchy or group related tasks together. Similarly the "link" feature helps to define connections between multiple tasks and to see dependency of each task. It also provides color coding features, which help users to choose different colors to mark those tasks which are critical to the project. In this way you can prioritize each task.  And it also enables you edit or update these tasks partially or completely when required.

Flow chart of project activities

One other notable feature of project-plan is scheduling. You can create professional-looking project schedules that impress your team as well as your client. These schedules can be shared and print quickly. The Project-Plan allows you to schedule project activities, tasks, resources, equipment, materials and team member meetings. It is the only online project management tool that support tracking your actual plan (i.e. actual time on finishing task) and baseline views (i.e. planned time) at the same time. That means it will tell you, whether any of project phases is delayed or ahead of your expected time frame. In this way, you track and correct timing of each project phase and record the percent complete or the amount of effort consumed for your project in real-time linearly.

It also has advanced features like Gantt Charts. This Gantt chart tool comes with unique features that allow you to monitor planned, actual and baseline views all on the same screen.

Moreover it supports most Microsoft applications such as project, excel, word and Google services like Gmail, docs, calendar etc. You are allowed to import and export data between these tools. It also provides 24 x 7 supports free to the customer. All the executives are well-mannered and trained. They help you solve issues quickly. And these features are all available at a very economical rate. The figure given below shows the rates of various plans of Project-Plan.

Price Chart for projectplan

So please sign-up today and enjoy the existing project management tool. If you register today, you may get your first 30 days free of cost.


Gemini (countersoft.com)


an overview of gemini project managment


While discussing project management software it is essential to discuss some other category, nothing else issue tracking systems. Gemini is one of the most popular software in this category. It was developed by countersoft. It is perfect web based issue and bug tracking system as well as project management solution. It provides lot of features, of which scrum & agile project management, issue, bug tracking and help desk are major features. It also has several other features such as managing requirements; convey user stories and quality checks. It uses C#, ASP.Net as front end and uses Microsoft SQL database server as its back end, as a result it will provide decent performance than any other project management solutions tested in this post. Moreover users can easily Integrate Gemini Bug Tracking software with Microsoft Visual Studio, Microsoft Outlook, and Subversion. It is available in two versions, local server version that can be downloaded and installed on your pc and cloud or web version. In addition to all this, it was available most amazing price. Its cost around $85 for local version and $10 for cloud version. Figure show below give overview of price & schemes of countersoft’s Gemini.

price chart of gemini by countersoft


A detailed review about Gemini is posted separately at eTechlic. To read it please clicks here.

Please remember that good planning is the backbone for success of any project. So spending money to buy a project management service is not wastage. It in fact helps you a lot to save money by reducing unwanted expenses in a closed time frame.